
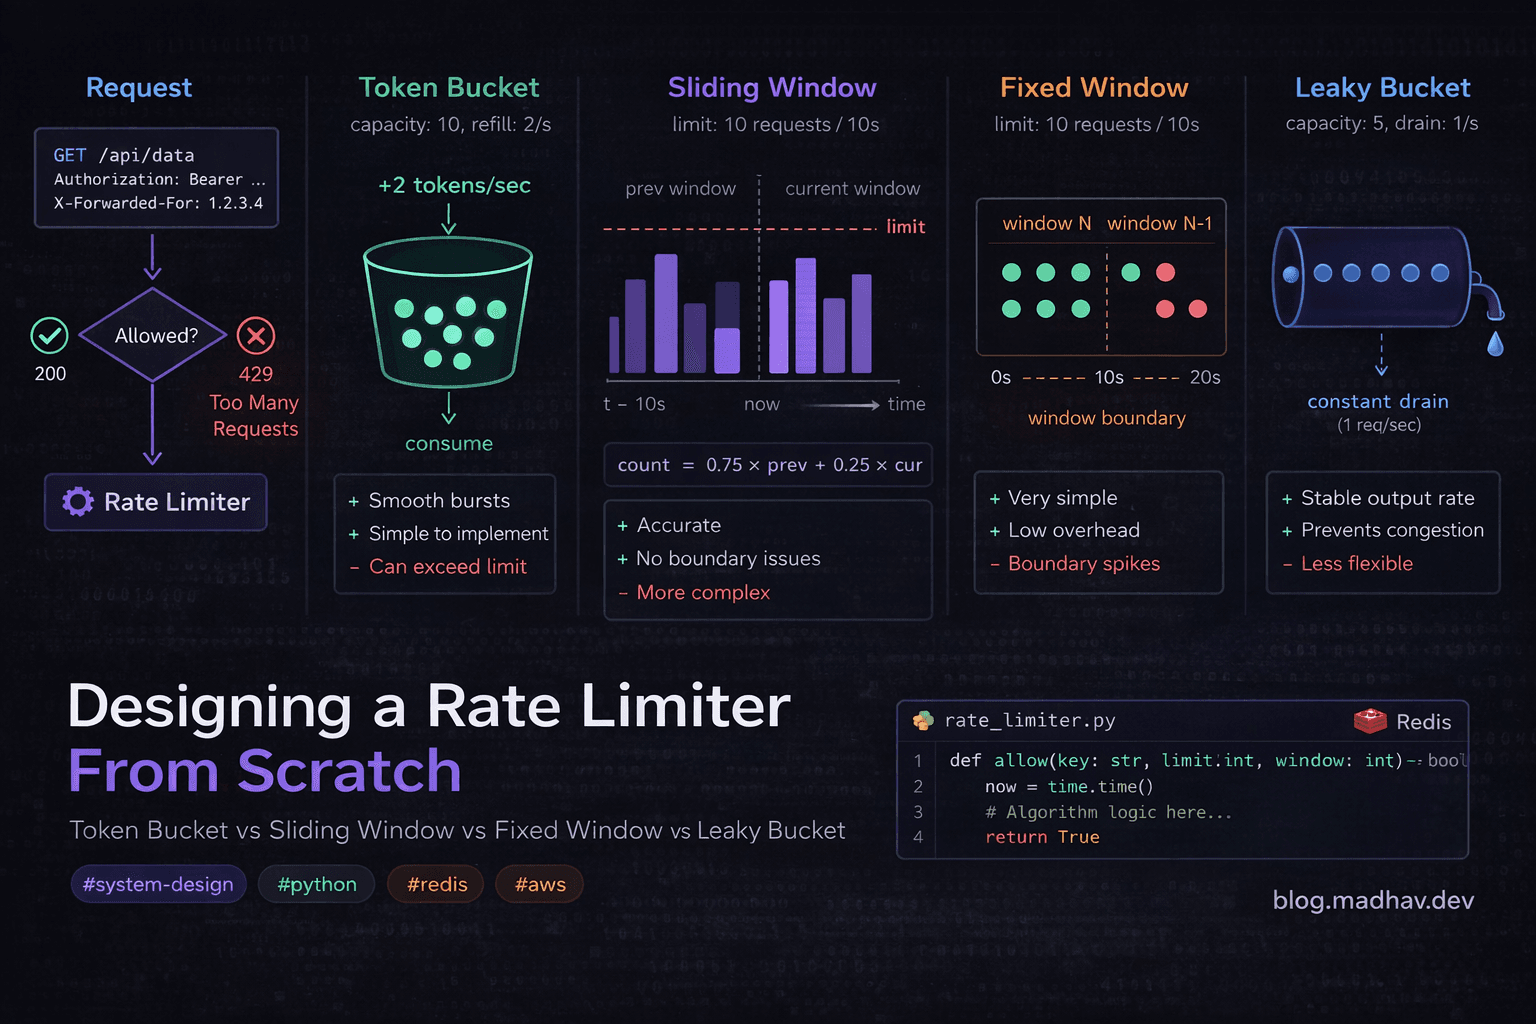
Designing a Rate Limiter From Scratch — Token Bucket vs Sliding Window vs Fixed Window vs Leaky Bucket
A practical system design breakdown covering all 4 algorithms, per-user and per-IP limiting, and how to implement it in a distributed system
Why Most Rate Limiter Articles Miss the Point
Search "rate limiter system design" and you'll find two kinds of articles.
The first kind gives you a surface-level overview of algorithms with no real implementation details. The second gives you a Redis snippet with no explanation of why that algorithm was chosen, what its failure modes are, or how it behaves under traffic spikes.
Neither prepares you for the real question — which algorithm do you actually use, and when?
This post covers all four major rate-limiting algorithms, compares them honestly, and shows you how to implement per-user and per-IP limiting in a distributed system. By the end, you'll have a decision framework you can apply to any project — not just a definition to recite in an interview.
What Is Rate Limiting and Why Does It Matter?
Rate limiting controls how many requests a client can make to your system in a given time window.
Without it:
A single misbehaving client can exhaust your server resources
A credential stuffing attack tries thousands of passwords per second
A DDoS amplification attack overwhelms your upstream services
One heavy API consumer degrades the experience for everyone else
Rate limiting protects your system at the edge — before expensive business logic runs.
The Four Algorithms
1. Fixed Window Counter
How it works:
Divide time into fixed windows (e.g., every 60 seconds). Count requests per client per window. Reject once the count exceeds the limit.
Window: 12:00:00 → 12:01:00  |  Limit: 100 requests

Client A: ████████████████ 87 requests  ✅
Client B: ████████████████████████ 100 requests  ✅ (101st rejected)
Implementation (Python + Redis):
import redis
import time

r = redis.Redis()

def is_allowed_fixed_window(client_id: str, limit: int, window_seconds: int) -> bool:
    window_key = int(time.time() // window_seconds)
    key = f"rate:{client_id}:{window_key}"

    count = r.incr(key)
    if count == 1:
        r.expire(key, window_seconds)

    return count <= limit
Pros:
Dead simple to implement
Very low memory — one counter per client per window
Easy to reason about and debug
Cons — the boundary problem:
This is the critical flaw. A client can make 100 requests at 12:00:59 and another 100 at 12:01:01 — 200 requests in 2 seconds, both within their respective windows but double the intended limit.
Window 1 ends ──────────────────┐
                                 │
                  100 requests ──┘└── 100 requests
                                 │
Window 2 starts ─────────────────┘

200 requests in ~2 seconds. Window boundary exploited.
When to use it: Internal admin tools, low-stakes APIs, anywhere simplicity matters more than precision.
2. Sliding Window Counter
How it works:
A refinement of Fixed Window that weights the previous window's count based on how far through the current window you are.
Current count =
  (previous_window_count × overlap_ratio) + current_window_count
Example:
You're 25% through the current window. Previous window had 80 requests. Current window has 30 so far.
Weighted count = (80 × 0.75) + 30 = 60 + 30 = 90
Implementation:
def is_allowed_sliding_window(client_id: str, limit: int, window_seconds: int) -> bool:
    now = time.time()
    current_window = int(now // window_seconds)
    previous_window = current_window - 1

    # How far through the current window are we?
    elapsed = now % window_seconds
    overlap_ratio = 1 - (elapsed / window_seconds)

    current_key = f"rate:{client_id}:{current_window}"
    previous_key = f"rate:{client_id}:{previous_window}"

    current_count = int(r.get(current_key) or 0)
    previous_count = int(r.get(previous_key) or 0)

    weighted_count = (previous_count * overlap_ratio) + current_count

    if weighted_count >= limit:
        return False

    count = r.incr(current_key)
    if count == 1:
        r.expire(current_key, window_seconds * 2)

    return True
Pros:
Solves the boundary burst problem
Still memory-efficient — just two counters per client
Good approximation of true sliding window behaviour
Cons:
The weighting is an approximation — not perfectly accurate
Slightly harder to implement correctly
Edge cases around window boundaries need care
When to use it: Public APIs where you want fairness without the complexity of a full sliding window log.
3. Token Bucket
How it works:
Each client has a bucket that holds tokens. Tokens refill at a constant rate up to a maximum capacity. Each request consumes one token. No token = request rejected.
Bucket capacity: 10 tokens
Refill rate: 2 tokens/second

t=0:  [██████████] 10 tokens
t=1:  Request → [█████████ ] 9 tokens
t=1:  Request → [████████  ] 8 tokens
t=2:  Refill  → [██████████] 10 tokens (capped at max)
Implementation:
import time

def is_allowed_token_bucket(
    client_id: str,
    capacity: int,
    refill_rate: float  # tokens per second
) -> bool:
    key = f"token_bucket:{client_id}"
    now = time.time()

    # Lua script for atomic read-modify-write
    lua_script = """
    local key = KEYS[1]
    local capacity = tonumber(ARGV[1])
    local refill_rate = tonumber(ARGV[2])
    local now = tonumber(ARGV[3])

    local bucket = redis.call('HMGET', key, 'tokens', 'last_refill')
    local tokens = tonumber(bucket[1]) or capacity
    local last_refill = tonumber(bucket[2]) or now

    -- Add tokens based on time elapsed
    local elapsed = now - last_refill
    tokens = math.min(capacity, tokens + elapsed * refill_rate)

    if tokens < 1 then
        return 0  -- Rejected
    end

    tokens = tokens - 1
    redis.call('HMSET', key, 'tokens', tokens, 'last_refill', now)
    redis.call('EXPIRE', key, 3600)
    return 1  -- Allowed
    """

    result = r.eval(lua_script, 1, key, capacity, refill_rate, now)
    return result == 1
Why Lua? Redis executes Lua scripts atomically — essential here to prevent race conditions where two concurrent requests both read the same token count and both think they can proceed.
Pros:
Handles bursts naturally — a client can use saved-up tokens for a short burst
Smooth traffic shaping
Widely used in production (AWS API Gateway uses token bucket internally)
Cons:
Two parameters to tune (capacity + refill rate) — easy to misconfigure
Slightly more complex implementation
Burst behaviour can be surprising if you're not expecting it
When to use it: APIs where some bursting is acceptable — e.g. a user uploading a batch of files. The token bucket lets them burst briefly without being punished for it.
4. Leaky Bucket
How it works:
Requests enter a queue (the bucket). They're processed at a constant rate regardless of how fast they arrive. If the queue is full, new requests are rejected.
Incoming requests (variable rate)
         │││││││││
         ▼▼▼▼▼▼▼▼▼
    ┌─────────────┐
    │  Queue      │ ← Max capacity: 10
    │  ▓▓▓▓▓▓▓   │
    └──────┬──────┘
           │ constant outflow
           ▼▼▼▼▼▼▼▼  (e.g. 5 req/sec)
Implementation:
def is_allowed_leaky_bucket(
    client_id: str,
    capacity: int,
    leak_rate: float  # requests per second
) -> bool:
    key = f"leaky:{client_id}"
    now = time.time()

    lua_script = """
    local key = KEYS[1]
    local capacity = tonumber(ARGV[1])
    local leak_rate = tonumber(ARGV[2])
    local now = tonumber(ARGV[3])

    local bucket = redis.call('HMGET', key, 'queue_size', 'last_leak')
    local queue_size = tonumber(bucket[1]) or 0
    local last_leak = tonumber(bucket[2]) or now

    -- Drain the bucket based on elapsed time
    local elapsed = now - last_leak
    local leaked = math.floor(elapsed * leak_rate)
    queue_size = math.max(0, queue_size - leaked)

    if queue_size >= capacity then
        return 0  -- Bucket full, reject
    end

    queue_size = queue_size + 1
    redis.call('HMSET', key, 'queue_size', queue_size, 'last_leak', now)
    redis.call('EXPIRE', key, 3600)
    return 1  -- Allowed
    """

    result = r.eval(lua_script, 1, key, capacity, leak_rate, now)
    return result == 1
Pros:
Guarantees a perfectly smooth, consistent outflow rate
Protects downstream services from any burst whatsoever
Predictable processing rate
Cons:
Bursts are always rejected — even legitimate ones
Queue management adds latency
Less intuitive than token bucket
When to use it: Protecting downstream services that can't handle any variation in request rate — payment processors, third-party APIs with strict rate limits, legacy systems with fixed throughput.
Algorithm Comparison
| Algorithm | Burst Handling | Memory | Accuracy | Implementation | Best For |
|---|---|---|---|---|---|
| Fixed Window | ❌ Boundary exploitable | ✅ Very low | ⚠️ Approximate | ✅ Simple | Internal tools |
| Sliding Window | ✅ Good | ✅ Low | ✅ Good | ⚠️ Moderate | Public APIs |
| Token Bucket | ✅ Allows bursts | ⚠️ Medium | ✅ Accurate | ⚠️ Moderate | User-facing APIs |
| Leaky Bucket | ❌ Smooths all bursts | ⚠️ Medium | ✅ Accurate | ⚠️ Moderate | Downstream protection |
Per-User vs Per-IP Limiting
This is where most tutorials stop. Real systems need both.
The Problem With IP-Only Limiting
Users behind corporate NAT share one IP — limit one, limit all
IPv6 makes IP-based blocking trivial to bypass (rotate addresses)
Mobile users switch IPs constantly
The Problem With User-Only Limiting
Unauthenticated endpoints can't use user IDs
Login endpoints need IP limiting before a user ID is even known
Credential stuffing attacks rotate user accounts
The Solution: Layered Limiting
Apply both, with different limits and algorithms for each layer:
from fastapi import FastAPI, Request, HTTPException
from typing import Optional

app = FastAPI()

# Layer 1: IP-based (protects unauthenticated endpoints)
IP_LIMIT = 200        # requests per minute per IP
IP_WINDOW = 60

# Layer 2: User-based (protects authenticated endpoints)
USER_LIMIT = 100      # requests per minute per user
USER_WINDOW = 60

# Layer 3: Endpoint-specific (protects sensitive endpoints)
LOGIN_LIMIT = 5       # login attempts per minute per IP
LOGIN_WINDOW = 60

def get_client_ip(request: Request) -> str:
    # Respect X-Forwarded-For if behind a load balancer
    forwarded_for = request.headers.get("X-Forwarded-For")
    if forwarded_for:
        return forwarded_for.split(",")[0].strip()
    return request.client.host

async def rate_limit_middleware(
    request: Request,
    user_id: Optional[str] = None
):
    client_ip = get_client_ip(request)
    endpoint = request.url.path

    # Layer 1: Always check IP
    if not is_allowed_sliding_window(f"ip:{client_ip}", IP_LIMIT, IP_WINDOW):
        raise HTTPException(
            status_code=429,
            detail="Too many requests from this IP",
            headers={"Retry-After": "60"}
        )

    # Layer 2: Check user if authenticated
    if user_id:
        if not is_allowed_token_bucket(f"user:{user_id}", USER_LIMIT, USER_LIMIT/USER_WINDOW):
            raise HTTPException(
                status_code=429,
                detail="Rate limit exceeded. Please slow down.",
                headers={"Retry-After": "60"}
            )

    # Layer 3: Tighter limits for sensitive endpoints
    sensitive_endpoints = ["/auth/login", "/auth/register", "/auth/reset-password"]
    if endpoint in sensitive_endpoints:
        if not is_allowed_fixed_window(f"login:{client_ip}", LOGIN_LIMIT, LOGIN_WINDOW):
            raise HTTPException(
                status_code=429,
                detail="Too many authentication attempts",
                headers={"Retry-After": "60", "X-RateLimit-Limit": str(LOGIN_LIMIT)}
            )


@app.middleware("http")
async def apply_rate_limiting(request: Request, call_next):
    user_id = request.headers.get("X-User-ID")  # Set by auth middleware upstream
    await rate_limit_middleware(request, user_id)
    response = await call_next(request)
    return response
Distributed Rate Limiting — The Hard Part
A single Redis instance works fine until you have multiple API servers. The challenge: requests from the same client hit different servers, each with their own in-memory state.
Architecture
Client
  │
  ▼
Load Balancer
  ├── API Server 1 ──┐
  ├── API Server 2 ──┼──► Redis Cluster (shared state)
  └── API Server 3 ──┘
All servers share a single Redis cluster for rate limit state. This works well up to very high scale.
Redis Cluster Considerations
Use Redis Cluster (not Sentinel) for horizontal scaling
Hash slot distribution means related keys (same client) land on the same node — consistent
Use connection pooling — don't open a new Redis connection per request
# Production Redis setup with connection pooling
import redis

pool = redis.ConnectionPool(
    host='your-redis-cluster-endpoint',
    port=6379,
    max_connections=50,
    socket_connect_timeout=1,
    socket_timeout=1
)

r = redis.Redis(connection_pool=pool)
What Happens When Redis Goes Down?
Two options and you need to decide upfront:
Fail open — if Redis is unavailable, allow all requests. Traffic flows, no revenue impact, risk of abuse.
Fail closed — if Redis is unavailable, reject all requests. No abuse, but service is degraded for legitimate users.
For most APIs, fail open with alerting is the right call. Add a circuit breaker:
import time

redis_healthy = True
last_redis_check = 0

def is_allowed_with_fallback(client_id: str, limit: int, window: int) -> bool:
    global redis_healthy, last_redis_check

    # Check Redis health every 5 seconds
    if not redis_healthy and time.time() - last_redis_check > 5:
        try:
            r.ping()
            redis_healthy = True
        except:
            last_redis_check = time.time()
            return True  # Fail open

    try:
        result = is_allowed_sliding_window(client_id, limit, window)
        redis_healthy = True
        return result
    except Exception:
        redis_healthy = False
        last_redis_check = time.time()
        return True  # Fail open — allow request, log the issue
Response Headers — Don't Forget These
Always return rate limit headers so clients can self-throttle:
from fastapi import Response

def add_rate_limit_headers(
    response: Response,
    limit: int,
    remaining: int,
    reset_at: int  # Unix timestamp
):
    response.headers["X-RateLimit-Limit"] = str(limit)
    response.headers["X-RateLimit-Remaining"] = str(max(0, remaining))
    response.headers["X-RateLimit-Reset"] = str(reset_at)
    response.headers["Retry-After"] = str(reset_at - int(time.time()))
Well-behaved API clients use these headers to back off automatically — which means fewer retries hammering your system when limits are hit.
Where to Put the Rate Limiter
You have three options:
Option 1: API Gateway (AWS API Gateway / Kong)
Easiest to set up — configure, not code
Limited flexibility — hard to do per-user logic
Good for baseline IP protection
Option 2: Middleware in your application
Full control over logic
Access to user context, request data, business rules
The implementation shown above
Option 3: Dedicated rate limit service
Centralised policy management across multiple services
More infrastructure to maintain
Worth it at large scale (10+ services)
For most teams: start with middleware, move to a dedicated service when you have 5+ services that need a consistent rate-limiting policy.
Key Takeaways
Fixed Window is fine for low-stakes internal APIs — don't over-engineer
Sliding Window is the pragmatic choice for most public APIs — good accuracy, low cost
Token Bucket is best when some bursting is acceptable and expected
Leaky Bucket is for protecting downstream services that need perfectly smooth traffic
Layer your limits — IP-level and user-level serve different purposes, use both
Always use Lua scripts in Redis for rate limit operations — atomicity is not optional
Decide your Redis failure mode upfront — fail open or fail closed, document it
Return rate limit headers — good clients will use them and reduce your load
What Would You Do Differently?
Every system has different constraints. Some teams need per-organisation limits, per-endpoint limits, or dynamic limits that change based on subscription tier.
What's the most interesting rate-limiting challenge you've tackled? Drop it in the comments — I read every one.
If you found this useful, follow me on LinkedIn where I post about system design, AWS, and engineering career growth every week.